# Prepare Wordpress
## JSON-API
This app already tested using wordpress **version 5.x**'
JSON API plugin was closed on August 7, 2019 and is no longer available for download from this page , so we provide manual install JSON-API plugin from zip file
### **1. Download Install JSON-API plugin**
You can download latest version of json-api plugin file from this folder
{% hint style="info" %}
[**DOWNLOAD JSON API**](https://drive.google.com/drive/folders/1ec4mGV4Z1i_Hf86gR21FVDlJgo-DXtUo)
{% endhint %}
and install manual to your wedpress website.

After installation finish, please **Activate Plugin**

### **2. Wordpress Configuration**
before your wordpress ready we need to make some configuration. Please go to **Settings > JSON API** , this picture below the default configuration from JSON API :

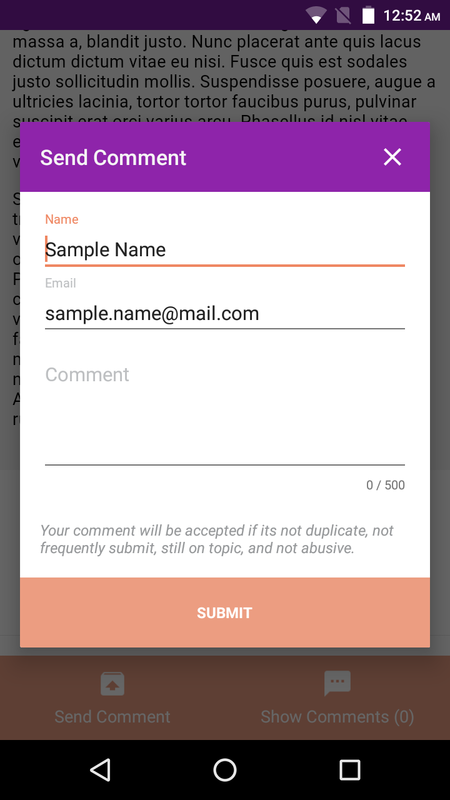
If you want you Android app display comment form like picture below, you need **Activate Respond Controller** submit\_comment on blue circle. But if you **not Activate** that controller when press **send comment** button will direct to webview.
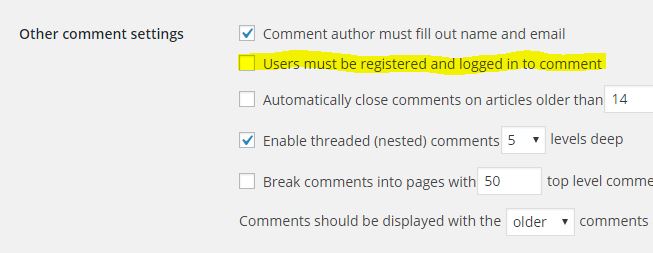
### **3. Important, Config MUST\_REGISTER\_TO\_COMMENT**
Please go to **Settings > Discussion**

You nee to make this same with our android, **open file data/AppConfig.java** - when **checked** set on AppConfig.java **true**- when **uncheck** set on AppConfig.java **false**
```java
public class AppConfig {
public static final boolean MUST_REGISTER_TO_COMMENT = false;
. . .
. . .
}
```
## WP-APP-NOTIF
### **INSTALL NOTIF PLUGIN**
This step not mandatory if you don't want use notification.
1\. Zip folder wp-app-notif into wp-app-notif**.zip**\
2\. Go to your wordpress admin menu **Pugin > Add New > Upload Plugin** \
3\. Select **wp-fcm.zip** and Install Now then **Activate Plugin**
After You install and activate plugin you need to set One Signal Key\
Here the tutorial how to get One Signal App Id for **Notification**
### **SECURITY CODE**
We implement security scheme to prevent spam submission data. We use security code that use for both side **android** and **server**. Security code is secret data, so you should not share to anyone without authorization.
You can generate your new one from this site : [**http://www.unit-conversion.info/texttools/random-string-generator/**](http://www.unit-conversion.info/texttools/random-string-generator/)
We recommended you to use Alpha Numeric string with length 100